wlanboy
Content Contributer
I am using the Arduino for quite a long time and I often like to control the Arduino from my Raspberry Pi.
Xbee itself is cool but quite expensive, so I searched for a cheap Bluetooth module that is offering a serial console.
And found one:

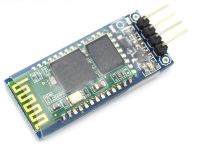
It is a "HC-06 Wireless Bluetooth Transceiver (Host-Slave integration) RS232/ TTL Module"
Search for "Bluetooth HC-06" on Ebay and you will find a lot of these modules.
Costs about $10 and is supporting Bluetooth 2.0 + EDR (chip is BC417143).
Maximum serial baud rate is 1382400bps.
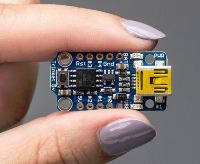
Another finding is one of the smallest Arduino Boards that is supporting 5V logic:
Adafruit Trinket - Mini Microcontroller.

And one of the cheapest Arduinos too: $7.95.
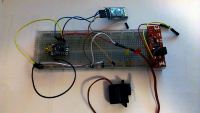
My setup is:

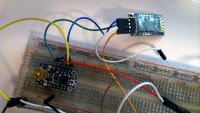
And the bluetooth part:

Note: I did not connect the serial send pin to the Trinket because I only wanted to receive commands.
The whole sketch for the Trinket (with some Trinket special code for servos) to stear a servo motor through bluetooth:
#include <SoftwareSerial.h>
#include <Adafruit_SoftServo.h>
int pinTX = 2;
int pinRX = 0;
int pinMotor = 1;
SoftwareSerial mySerial(pinRX, pinTX);
Adafruit_SoftServo myservo;
void setup()
{
OCR0A = 0xAF; // any number is OK
TIMSK |= _BV(OCIE0A); // Turn on the compare interrupt (below)
pinMode(pinRX, INPUT);
pinMode(pinTX, OUTPUT);
pinMode(pinMotor, OUTPUT);
mySerial.begin(9600);
myservo.attach(pinMotor);
myservo.write(0);
delay(50);
}
int value2;
int motor;
int value;
void loop()
{
motor = 0;
value = 0;
if (mySerial.available() > 0) {
//Read serial string
value2 = mySerial.read();
//Convert ASCII to int
value2 = value2 - 48;
//Map value from 0 to 9 to the range of 0 to 179 (180 degrees servo)
value = map(value2, 0, 9, 0, 179);
myservo.write(value);
delay(50);
}
}
volatile uint8_t counter = 0;
SIGNAL(TIMER0_COMPA_vect) {
// this gets called every 2 milliseconds
counter += 2;
// every 20 milliseconds, refresh the servos
if (counter >= 20) {
counter = 0;
myservo.refresh();
}
}
Basically the Bluetooth chip is doing everything for us.
He offers a serial console where chars can be sent and retrieved.
The basic serial command code for an Arduino is:
#include <SoftwareSerial.h>
#define RxD 8
#define TxD 9
SoftwareSerial blueToothSerial(RxD,TxD);
void setup()
{
Serial.begin(9600);
pinMode(RxD, INPUT);
pinMode(TxD, OUTPUT);
setupBlueToothConnection();
}
void loop()
{
while(blueToothSerial.available()){//check if there's any data available
process_command();
}
}
void process_command()
{
char arg = blueToothSerial.read();
int aNumber;
if (arg != NULL)
{
aNumber=int(arg);
}
String text = "";
if (aNumber == 1) {
text = "one";
}
else if (aNumber == 2) {
text = "two";
}
blueToothSerial.println(text);
}
So we are using a SoftwareSerial instance with two defined ports (send/receive).
We check if data is available and are processing a command.
You can put the data to an array and stop if a carrige return or any other character is sent.
And you can split the string to parse arguments.
Or you can simply use the CmdManager lib for Arduino.
One of their good examples shows how easy it is to use this lib:
// *** SentandReceive ***
// This example expands the previous Receive example. The Arduino will now send back a status.
// It adds a demonstration of how to:
// - Handle received commands that do not have a function attached
// - Send a command with a parameter to the PC
#include <CmdMessenger.h> // CmdMessenger
// Blinking led variables
bool ledState = 0; // Current state of Led
const int kBlinkLed = 13; // Pin of internal Led
// Attach a new CmdMessenger object to the default Serial port
CmdMessenger cmdMessenger = CmdMessenger(Serial);
// This is the list of recognized commands. These can be commands that can either be sent or received.
// In order to receive, attach a callback function to these events
enum
{
kSetLed , // Command to request led to be set in specific state
kStatus , // Command to report status
};
// Callbacks define on which received commands we take action
void attachCommandCallbacks()
{
// Attach callback methods
cmdMessenger.attach(OnUnknownCommand);
cmdMessenger.attach(kSetLed, OnSetLed);
}
// Called when a received command has no attached function
void OnUnknownCommand()
{
cmdMessenger.sendCmd(kStatus,"Command without attached callback");
}
// Callback function that sets led on or off
void OnSetLed()
{
// Read led state argument, interpret string as boolean
ledState = cmdMessenger.readBoolArg();
// Set led
digitalWrite(kBlinkLed, ledState?HIGH:LOW);
// Send back status that describes the led state
cmdMessenger.sendCmd(kStatus,(int)ledState);
}
// Setup function
void setup()
{
// Listen on serial connection for messages from the PC
Serial.begin(115200);
// Adds newline to every command
cmdMessenger.printLfCr();
// Attach my application's user-defined callback methods
attachCommandCallbacks();
// Send the status to the PC that says the Arduino has booted
// Note that this is a good debug function: it will let you also know
// if your program had a bug and the arduino restarted
cmdMessenger.sendCmd(kStatus,"Arduino has started!");
// set pin for blink LED
pinMode(kBlinkLed, OUTPUT);
}
// Loop function
void loop()
{
// Process incoming serial data, and perform callbacks
cmdMessenger.feedinSerialData();
}
A beautiful lib that does all the nasty things for you.
So hopefully you will start with your bluetooth controlled projects soon.
Looking forward to your ideas.
Xbee itself is cool but quite expensive, so I searched for a cheap Bluetooth module that is offering a serial console.
And found one:

It is a "HC-06 Wireless Bluetooth Transceiver (Host-Slave integration) RS232/ TTL Module"
Search for "Bluetooth HC-06" on Ebay and you will find a lot of these modules.
Costs about $10 and is supporting Bluetooth 2.0 + EDR (chip is BC417143).
Maximum serial baud rate is 1382400bps.
Another finding is one of the smallest Arduino Boards that is supporting 5V logic:
Adafruit Trinket - Mini Microcontroller.

And one of the cheapest Arduinos too: $7.95.
My setup is:

And the bluetooth part:

Note: I did not connect the serial send pin to the Trinket because I only wanted to receive commands.
The whole sketch for the Trinket (with some Trinket special code for servos) to stear a servo motor through bluetooth:
#include <SoftwareSerial.h>
#include <Adafruit_SoftServo.h>
int pinTX = 2;
int pinRX = 0;
int pinMotor = 1;
SoftwareSerial mySerial(pinRX, pinTX);
Adafruit_SoftServo myservo;
void setup()
{
OCR0A = 0xAF; // any number is OK
TIMSK |= _BV(OCIE0A); // Turn on the compare interrupt (below)
pinMode(pinRX, INPUT);
pinMode(pinTX, OUTPUT);
pinMode(pinMotor, OUTPUT);
mySerial.begin(9600);
myservo.attach(pinMotor);
myservo.write(0);
delay(50);
}
int value2;
int motor;
int value;
void loop()
{
motor = 0;
value = 0;
if (mySerial.available() > 0) {
//Read serial string
value2 = mySerial.read();
//Convert ASCII to int
value2 = value2 - 48;
//Map value from 0 to 9 to the range of 0 to 179 (180 degrees servo)
value = map(value2, 0, 9, 0, 179);
myservo.write(value);
delay(50);
}
}
volatile uint8_t counter = 0;
SIGNAL(TIMER0_COMPA_vect) {
// this gets called every 2 milliseconds
counter += 2;
// every 20 milliseconds, refresh the servos
if (counter >= 20) {
counter = 0;
myservo.refresh();
}
}
Basically the Bluetooth chip is doing everything for us.
He offers a serial console where chars can be sent and retrieved.
The basic serial command code for an Arduino is:
#include <SoftwareSerial.h>
#define RxD 8
#define TxD 9
SoftwareSerial blueToothSerial(RxD,TxD);
void setup()
{
Serial.begin(9600);
pinMode(RxD, INPUT);
pinMode(TxD, OUTPUT);
setupBlueToothConnection();
}
void loop()
{
while(blueToothSerial.available()){//check if there's any data available
process_command();
}
}
void process_command()
{
char arg = blueToothSerial.read();
int aNumber;
if (arg != NULL)
{
aNumber=int(arg);
}
String text = "";
if (aNumber == 1) {
text = "one";
}
else if (aNumber == 2) {
text = "two";
}
blueToothSerial.println(text);
}
So we are using a SoftwareSerial instance with two defined ports (send/receive).
We check if data is available and are processing a command.
You can put the data to an array and stop if a carrige return or any other character is sent.
And you can split the string to parse arguments.
Or you can simply use the CmdManager lib for Arduino.
One of their good examples shows how easy it is to use this lib:
// *** SentandReceive ***
// This example expands the previous Receive example. The Arduino will now send back a status.
// It adds a demonstration of how to:
// - Handle received commands that do not have a function attached
// - Send a command with a parameter to the PC
#include <CmdMessenger.h> // CmdMessenger
// Blinking led variables
bool ledState = 0; // Current state of Led
const int kBlinkLed = 13; // Pin of internal Led
// Attach a new CmdMessenger object to the default Serial port
CmdMessenger cmdMessenger = CmdMessenger(Serial);
// This is the list of recognized commands. These can be commands that can either be sent or received.
// In order to receive, attach a callback function to these events
enum
{
kSetLed , // Command to request led to be set in specific state
kStatus , // Command to report status
};
// Callbacks define on which received commands we take action
void attachCommandCallbacks()
{
// Attach callback methods
cmdMessenger.attach(OnUnknownCommand);
cmdMessenger.attach(kSetLed, OnSetLed);
}
// Called when a received command has no attached function
void OnUnknownCommand()
{
cmdMessenger.sendCmd(kStatus,"Command without attached callback");
}
// Callback function that sets led on or off
void OnSetLed()
{
// Read led state argument, interpret string as boolean
ledState = cmdMessenger.readBoolArg();
// Set led
digitalWrite(kBlinkLed, ledState?HIGH:LOW);
// Send back status that describes the led state
cmdMessenger.sendCmd(kStatus,(int)ledState);
}
// Setup function
void setup()
{
// Listen on serial connection for messages from the PC
Serial.begin(115200);
// Adds newline to every command
cmdMessenger.printLfCr();
// Attach my application's user-defined callback methods
attachCommandCallbacks();
// Send the status to the PC that says the Arduino has booted
// Note that this is a good debug function: it will let you also know
// if your program had a bug and the arduino restarted
cmdMessenger.sendCmd(kStatus,"Arduino has started!");
// set pin for blink LED
pinMode(kBlinkLed, OUTPUT);
}
// Loop function
void loop()
{
// Process incoming serial data, and perform callbacks
cmdMessenger.feedinSerialData();
}
A beautiful lib that does all the nasty things for you.
So hopefully you will start with your bluetooth controlled projects soon.
Looking forward to your ideas.
