wlanboy
Content Contributer
This will be the start of a series of tutorials about IoT, servers, clients and how things can be connected.
I want to show how a opensource based IoT plattform that is host-able on any shared-hosting account can be build. So no special services, no Azure, no Google, no Bling-Bling-Newish things.
No Ruby, no Java, no Phyton. Plain PHP on server and C on client side. No root permissions and no customizing. Back to the roots of simple webhosting.
Every single line of code will be published on GitHub. Advices and pushes are welcome.
Later on I will add Redis and JS for some Pub/Sub things - but the start will be a plain simple LAMP stack.
Table of content:
So let's start with 1)
I really like Ruby - same with MongoDB, Redis, RabbitMQ and Hazelcast. But you have to configure and maintain the whole infrastructure for each single project.
Quite time consuming and sometimes frustrating if interfaces are changing or new config-files are invented. As fast as these frameworks and services are growing the more deprecated flags are spread through the users.
Not talking about failover, backup/restore and all the small things rising if more than 10 people are using a plattform.
A quad-core Raspberry Pi 2 running Ruby code, using a Phyton client connected with a RabbitMQ cluster to store information in a sharded MongoDB database. Whoohoo sounds good must be good. My math professor told me one thing that fits on such projects: "If you do not have a simple solution you are only fixing symptoms and not the real problem". He was and is right.
So the IoT thing is about reading analog/digital signals and storing them into a database. Exluding commands, workflows, visualization and all the other BI stuff.
I used the Raspberry Pi for most stuff because it was easy to run Ruby/Phyton scripts doing the whole work. But if you look to what has to be done there are three simple steps: measure, ship and store.
Measure signals is simple with any AVR 8-bit microcontroller. But they are lacking one thing: The internet connection.
The electronic things are quite easy and a physical LAN connection is easy but the TCP-IP stack is very expensive for microcontrollers - they have 2kb of RAM. Good luck to handle SSL handshakes.
But why should a single chip do all the work? The make-all-things-possible SoCs are quite expensive and you can only touch them through an SDK. No direct access to the core. So back to the basics.
What do you need to "ship" the data? Not much if you have an OpenWRT device. Curl is your friend. Just post the information and done. Authentification, SSL, encoding is done within this tool and you only need a bash and a working internet connection.
Most routers do not have a serial connection so I found an cheap way to connect the Arduino and the OpenWRT world.
You will find a quite simple solution on the server side too - if you look what has to be done - just receive a post request and store it into a database. Something, I strongly believe, that can be done without Java and Phyton.
We will of course build a REST-API, a documentation, authentification, tokens, SSL. So not a too simple PHP script - remeber we want to host the stuff on a shared hosting account for some $ per year.
2)
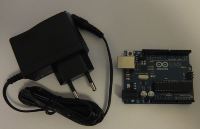
We start with a cheap Arduino Uno R3 and a 9V 1330mA power adapter.
ATmega328P with 32 KB flash memory, 2 KB SRAM running with 16 MHz.

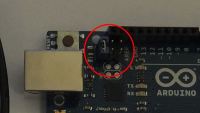
You have to set a jumper (old IDE HDD jumper is just fine) to disable the Mega16u2 chip.
Background: The Mega16u2 is used to upload the code from USB to the ATmega328P chip. But this connection is used for the bridge framework between OpenWRT and the Arduino.

The Arduino cost about $20.
There is a Arduino version with an OpenWRT core but it is quite expensive: Arduino YÚN costs about $80.
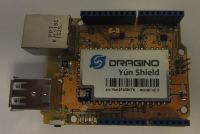
The Dragino Yun Shield which can be stacked on any Arduino costs $29. The core itself is opensource - in contrast to the closed YUN product.

Product page: http://www.dragino.com/products/yunshield/item/98-yun-shield-v2-3.html
Wiki page: http://wiki.dragino.com/index.php?title=Yun_Shield
Hardware specs:
A lot of power to run a http client. Compatible with all 3.3v and 5v boards!
Running the Arduino Bridge library: https://www.arduino.cc/en/Reference/YunBridgeLibrary
Within the AVR code you are able to call functions on the Linux core of the shield. Some basic commands are wrapped like curl:
void sendDataToServer(String data) {
Serial.println("http client begin");
HttpClient client;
String url = "http://testing.com/arduino?data="+data;
Serial.println(url);
client.get(url);
while (client.available()) {
char c = client.read();
Serial.print(c);
}
Serial.println("http client end");
}
And the same with process:
void postData()
{
Process linuxcommand;
String curlCmd;
String curlData[NUM_FIELDS];
// Construct curl data fields
for (int i=0; i<NUM_FIELDS; i )
{
curlData = "--data \"" fieldName "=" fieldData "\" ";
}
// Construct the curl command:
curlCmd = "curl ";
curlCmd = "--header ";
curlCmd = "\"Key: ";
curlCmd = privateKey;
curlCmd = "\" ";
for (int i=0; i<NUM_FIELDS; i )
curlCmd = curlData;
curlCmd = serviceURL publicKey;
Serial.print("Sending command: ");
Serial.println(curlCmd);
linuxcommand.runShellCommand(curlCmd);
Serial.print("Response: ");
while (linuxcommand.available())
{
char c = linuxcommand.read();
Serial.write(c);
}
}
This code is running on the 8-bit AVR microcontroller which is communicating with the OpenWRT Linux system through the bridge.
So a 5V * 1A = 0.12 kW per day device - able to use 5V logic and any WLAN connection - costing sub $50 - which is able to call any REST-Api with a simple C code. No Ruby, Phyton, Node.js or Java needed.
End of first part. Looking forward for any comments.
I want to show how a opensource based IoT plattform that is host-able on any shared-hosting account can be build. So no special services, no Azure, no Google, no Bling-Bling-Newish things.
No Ruby, no Java, no Phyton. Plain PHP on server and C on client side. No root permissions and no customizing. Back to the roots of simple webhosting.
Every single line of code will be published on GitHub. Advices and pushes are welcome.
Later on I will add Redis and JS for some Pub/Sub things - but the start will be a plain simple LAMP stack.
Table of content:
- Motivation
- Client side
- Server side
- Protocols
So let's start with 1)
I really like Ruby - same with MongoDB, Redis, RabbitMQ and Hazelcast. But you have to configure and maintain the whole infrastructure for each single project.
Quite time consuming and sometimes frustrating if interfaces are changing or new config-files are invented. As fast as these frameworks and services are growing the more deprecated flags are spread through the users.
Not talking about failover, backup/restore and all the small things rising if more than 10 people are using a plattform.
A quad-core Raspberry Pi 2 running Ruby code, using a Phyton client connected with a RabbitMQ cluster to store information in a sharded MongoDB database. Whoohoo sounds good must be good. My math professor told me one thing that fits on such projects: "If you do not have a simple solution you are only fixing symptoms and not the real problem". He was and is right.
So the IoT thing is about reading analog/digital signals and storing them into a database. Exluding commands, workflows, visualization and all the other BI stuff.
I used the Raspberry Pi for most stuff because it was easy to run Ruby/Phyton scripts doing the whole work. But if you look to what has to be done there are three simple steps: measure, ship and store.
Measure signals is simple with any AVR 8-bit microcontroller. But they are lacking one thing: The internet connection.
The electronic things are quite easy and a physical LAN connection is easy but the TCP-IP stack is very expensive for microcontrollers - they have 2kb of RAM. Good luck to handle SSL handshakes.
But why should a single chip do all the work? The make-all-things-possible SoCs are quite expensive and you can only touch them through an SDK. No direct access to the core. So back to the basics.
What do you need to "ship" the data? Not much if you have an OpenWRT device. Curl is your friend. Just post the information and done. Authentification, SSL, encoding is done within this tool and you only need a bash and a working internet connection.
Most routers do not have a serial connection so I found an cheap way to connect the Arduino and the OpenWRT world.
You will find a quite simple solution on the server side too - if you look what has to be done - just receive a post request and store it into a database. Something, I strongly believe, that can be done without Java and Phyton.
We will of course build a REST-API, a documentation, authentification, tokens, SSL. So not a too simple PHP script - remeber we want to host the stuff on a shared hosting account for some $ per year.
2)
We start with a cheap Arduino Uno R3 and a 9V 1330mA power adapter.
ATmega328P with 32 KB flash memory, 2 KB SRAM running with 16 MHz.

You have to set a jumper (old IDE HDD jumper is just fine) to disable the Mega16u2 chip.
Background: The Mega16u2 is used to upload the code from USB to the ATmega328P chip. But this connection is used for the bridge framework between OpenWRT and the Arduino.

The Arduino cost about $20.
There is a Arduino version with an OpenWRT core but it is quite expensive: Arduino YÚN costs about $80.
The Dragino Yun Shield which can be stacked on any Arduino costs $29. The core itself is opensource - in contrast to the closed YUN product.

Product page: http://www.dragino.com/products/yunshield/item/98-yun-shield-v2-3.html
Wiki page: http://wiki.dragino.com/index.php?title=Yun_Shield
Hardware specs:
- Processor: 400MHz
- Flash: 16MBytes
- RAM: 64MBytes
- 1 x 10M/100M RJ45 connector
- 150M WiFi 802.11 b/g/n
- External Antenna via I-Pex connector
- 1 x USB 2.0 host connector, used for USB storage or 3G connection
- 1 x MicroSD card slot
- Compatible with 3.3v or 5v Arduino
A lot of power to run a http client. Compatible with all 3.3v and 5v boards!
Running the Arduino Bridge library: https://www.arduino.cc/en/Reference/YunBridgeLibrary
Within the AVR code you are able to call functions on the Linux core of the shield. Some basic commands are wrapped like curl:
void sendDataToServer(String data) {
Serial.println("http client begin");
HttpClient client;
String url = "http://testing.com/arduino?data="+data;
Serial.println(url);
client.get(url);
while (client.available()) {
char c = client.read();
Serial.print(c);
}
Serial.println("http client end");
}
And the same with process:
void postData()
{
Process linuxcommand;
String curlCmd;
String curlData[NUM_FIELDS];
// Construct curl data fields
for (int i=0; i<NUM_FIELDS; i )
{
curlData = "--data \"" fieldName "=" fieldData "\" ";
}
// Construct the curl command:
curlCmd = "curl ";
curlCmd = "--header ";
curlCmd = "\"Key: ";
curlCmd = privateKey;
curlCmd = "\" ";
for (int i=0; i<NUM_FIELDS; i )
curlCmd = curlData;
curlCmd = serviceURL publicKey;
Serial.print("Sending command: ");
Serial.println(curlCmd);
linuxcommand.runShellCommand(curlCmd);
Serial.print("Response: ");
while (linuxcommand.available())
{
char c = linuxcommand.read();
Serial.write(c);
}
}
This code is running on the 8-bit AVR microcontroller which is communicating with the OpenWRT Linux system through the bridge.
So a 5V * 1A = 0.12 kW per day device - able to use 5V logic and any WLAN connection - costing sub $50 - which is able to call any REST-Api with a simple C code. No Ruby, Phyton, Node.js or Java needed.
End of first part. Looking forward for any comments.
Last edited by a moderator:
